layout: post
categories: Linux
title: Teleport 跳板机部署[转载漠然]
date: 2017-11-09 16:47:51 +0800
description: Teleport 跳板机部署
keywords: Teleport 跳板机
由于业务需求,以前账号管理混乱,所以很多人有生产服务器的 root 权限;所以目前需要一个能 ssh 登录线上服务器的工具,同时具有简单的审计功能;找了好久找到了这个小工具,以下记录一下搭建教程
一、环境准备
目前准备了 3 台虚拟机,两台位于内网 NAT 之后,一台位于公网可以直接链接;使用时客户端通过工具连接到公网跳板机上,然后实现自动跳转到内网任意主机;并且具有相应的操作回放审计,通过宿主机账户限制用户权限
| ip | 节点 |
|---|---|
| 92.223.67.84 | 公网 Master |
| 172.16.0.80 | 内网 Master |
| 172.16.0.81 | 内网 Node |
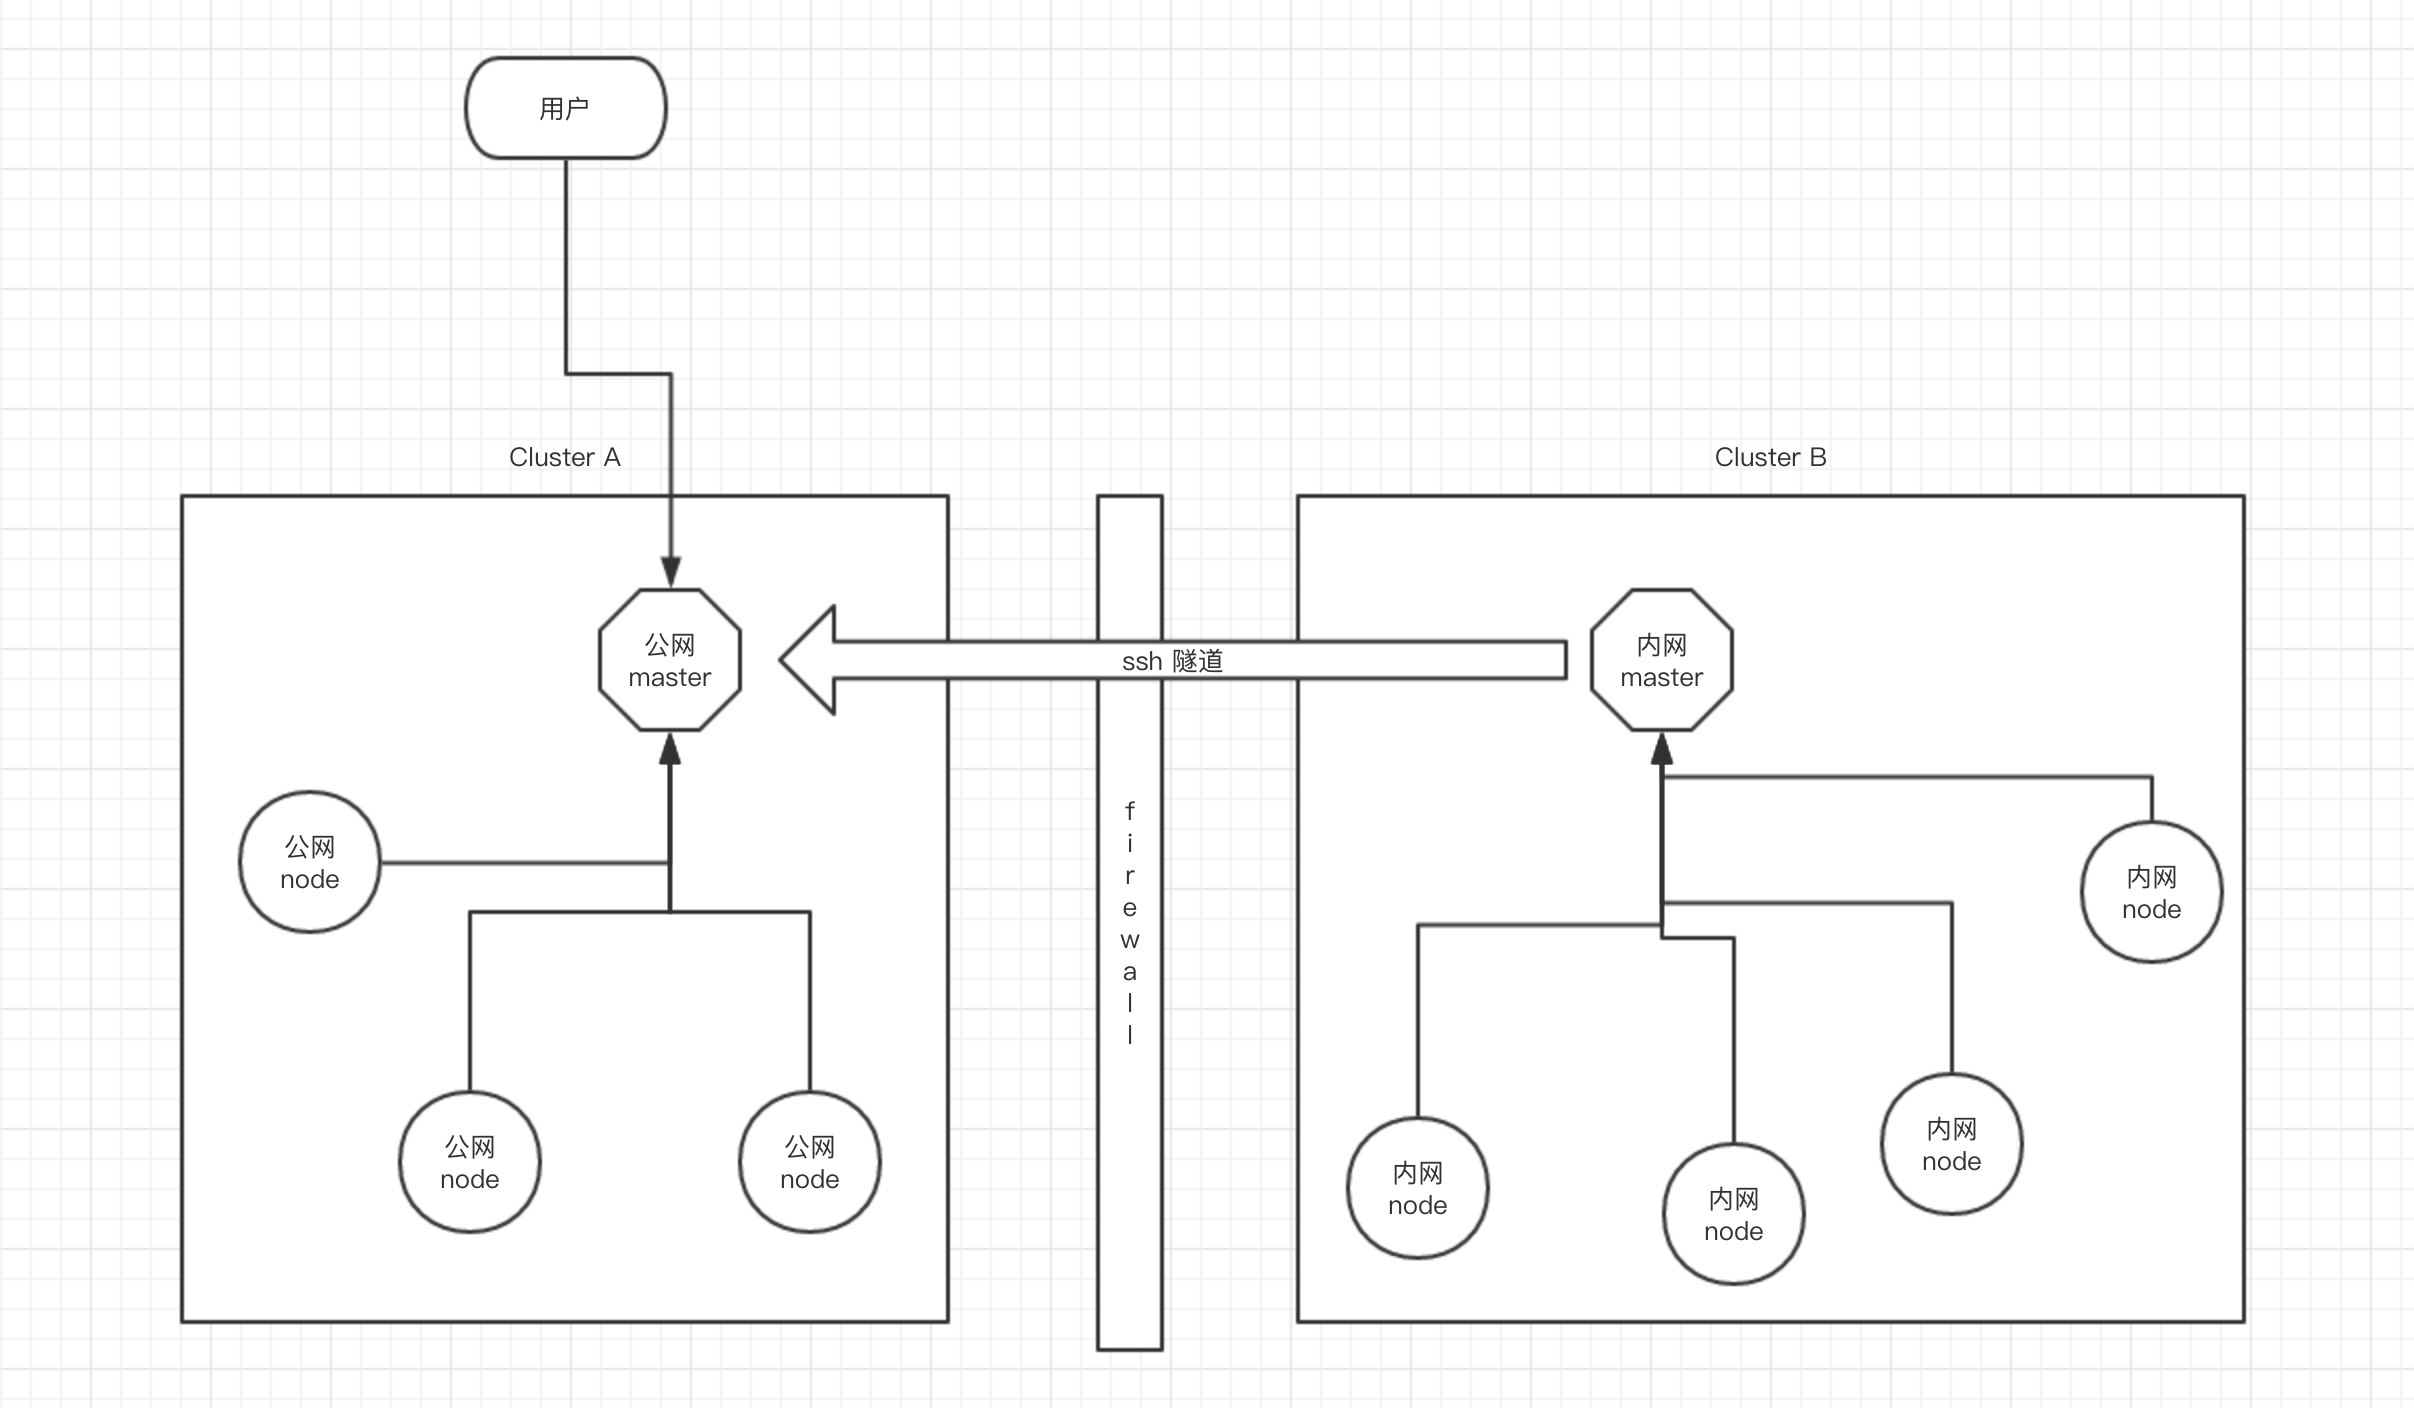
二、Teleport 工作模式
Teleport 工作时从宏观上看是以集群为单位,也就是说公网算作一个集群,内网算作另一个集群,内网集群通过 ssh 隧道保持跟公网的链接状态,同时内网机群允许公网集群用户连接,大体工作模式如下
三、搭建公网 Master
3.1、配置 Systemd
首先下载相关可执行文件并复制到 Path 目录下,然后创建一下配置目录等
wget https://github.com/gravitational/teleport/releases/download/v2.3.5/teleport-v2.3.5-linux-amd64-bin.tar.gz
tar -zxvf teleport-v2.3.5-linux-amd64-bin.tar.gz
mv teleport/tctl teleport/teleport teleport/tsh /usr/local/bin
mkdir -p /etc/teleport /data/teleport
然后为了让服务后台运行创建一个 systemd service 配置文件
cat > /etc/systemd/system/teleport.service <<EOF
[Unit]
Description=Teleport SSH Service
After=network.target

[Service]
Type=simple
Restart=always
ExecStart=/usr/local/bin/teleport start -c /etc/teleport/teleport.yaml

[Install]
WantedBy=multi-user.target
EOF
3.2、配置 Teleport
Systemd 配置完成后,就需要写一个 Teleport 的配置文件来让 Teleport 启动,具体选项含义可以参考 官方文档;以下为我的配置样例
# By default, this file should be stored in /etc/teleport.yaml

# This section of the configuration file applies to all teleport
# services.
teleport:
    # nodename allows to assign an alternative name this node can be reached by.
    # by default it's equal to hostname
    nodename: mritd.master

    # Data directory where Teleport keeps its data, like keys/users for
    # authentication (if using the default BoltDB back-end)
    data_dir: /data/teleport

    # one-time invitation token used to join a cluster. it is not used on
    # subsequent starts
    auth_token: jYektagNTmhjv9Dh

    # when running in multi-homed or NATed environments Teleport nodes need
    # to know which IP it will be reachable at by other nodes
    advertise_ip: 92.223.67.84

    # list of auth servers in a cluster. you will have more than one auth server
    # if you configure teleport auth to run in HA configuration
    auth_servers:
        - 0.0.0.0:3025
        - 0.0.0.0:3025

    # Teleport throttles all connections to avoid abuse. These settings allow
    # you to adjust the default limits
    connection_limits:
        max_connections: 1000
        max_users: 250

    # Logging configuration. Possible output values are 'stdout', 'stderr' and
    # 'syslog'. Possible severity values are INFO, WARN and ERROR (default).
    log:
        output: stdout
        severity: INFO

    # Type of storage used for keys. You need to configure this to use etcd
    # backend if you want to run Teleport in HA configuration.
    storage:
        type: bolt

    # Cipher algorithms that the server supports. This section only needs to be
    # set if you want to override the defaults.
    ciphers:
      - aes128-ctr
      - aes192-ctr
      - aes256-ctr
      - aes128-gcm@openssh.com
      - arcfour256
      - arcfour128

    # Key exchange algorithms that the server supports. This section only needs
    # to be set if you want to override the defaults.
    kex_algos:
      - curve25519-sha256@libssh.org
      - ecdh-sha2-nistp256
      - ecdh-sha2-nistp384
      - ecdh-sha2-nistp521
      - diffie-hellman-group14-sha1
      - diffie-hellman-group1-sha1

    # Message authentication code (MAC) algorithms that the server supports.
    # This section only needs to be set if you want to override the defaults.
    mac_algos:
      - hmac-sha2-256-etm@openssh.com
      - hmac-sha2-256
      - hmac-sha1
      - hmac-sha1-96

# This section configures the 'auth service':
auth_service:
    # Turns 'auth' role on. Default is 'yes'
    enabled: yes

    authentication:
        # default authentication type. possible values are 'local', 'oidc' and 'saml'
        # only local authentication (Teleport's own user DB) is supported in the open
        # source version
        type: local
        # second_factor can be off, otp, or u2f
        second_factor: otp
        # this section is used if second_factor is set to 'u2f'
        #u2f:
        #    # app_id must point to the URL of the Teleport Web UI (proxy) accessible
        #    # by the end users
        #    app_id: https://localhost:3080
        #    # facets must list all proxy servers if there are more than one deployed
        #    facets:
        #    - https://localhost:3080

    # IP and the port to bind to. Other Teleport nodes will be connecting to
    # this port (AKA "Auth API" or "Cluster API") to validate client
    # certificates
    listen_addr: 0.0.0.0:3025

    # Pre-defined tokens for adding new nodes to a cluster. Each token specifies
    # the role a new node will be allowed to assume. The more secure way to
    # add nodes is to use `ttl node add --ttl` command to generate auto-expiring
    # tokens.
    #
    # We recommend to use tools like `pwgen` to generate sufficiently random
    # tokens of 32+ byte length.
    tokens:
        - "proxy,node:jYektagNTmhjv9Dh"
        - "auth:jYektagNTmhjv9Dh"

    # Optional "cluster name" is needed when configuring trust between multiple
    # auth servers. A cluster name is used as part of a signature in certificates
    # generated by this CA.
    #
    # By default an automatically generated GUID is used.
    #
    # IMPORTANT: if you change cluster_name, it will invalidate all generated
    # certificates and keys (may need to wipe out /var/lib/teleport directory)
    cluster_name: "mritd"

# This section configures the 'node service':
ssh_service:
    # Turns 'ssh' role on. Default is 'yes'
    enabled: yes

    # IP and the port for SSH service to bind to.
    listen_addr: 0.0.0.0:3022
    # See explanation of labels in "Labeling Nodes" section below
    labels:
        role: master

    # List of the commands to periodically execute. Their output will be used as node labels.
    # See "Labeling Nodes" section below for more information.
    commands:
    - name: arch             # this command will add a label like 'arch=x86_64' to a node
      command: [uname, -p]
      period: 1h0m0s

    # enables reading ~/.tsh/environment before creating a session. by default
    # set to false, can be set true here or as a command line flag.
    permit_user_env: false

# This section configures the 'proxy servie'
proxy_service:
    # Turns 'proxy' role on. Default is 'yes'
    enabled: yes

    # SSH forwarding/proxy address. Command line (CLI) clients always begin their
    # SSH sessions by connecting to this port
    listen_addr: 0.0.0.0:3023

    # Reverse tunnel listening address. An auth server (CA) can establish an
    # outbound (from behind the firewall) connection to this address.
    # This will allow users of the outside CA to connect to behind-the-firewall
    # nodes.
    tunnel_listen_addr: 0.0.0.0:3024

    # The HTTPS listen address to serve the Web UI and also to authenticate the
    # command line (CLI) users via password+HOTP
    web_listen_addr: 0.0.0.0:3080

    # TLS certificate for the HTTPS connection. Configuring these properly is
    # critical for Teleport security.
    #https_key_file: /var/lib/teleport/webproxy_key.pem
    #https_cert_file: /var/lib/teleport/webproxy_cert.pem
然后启动 Teleport 即可
systemctl enable teleport
systemctl start teleport
如果启动出现如下错误
error: Could not load host key: /etc/ssh/ssh_host_ecdsa_key
error: Could not load host key: /etc/ssh/ssh_host_ed25519_key
请执行 ssh-keygen 命令自行生成相关秘钥
ssh-keygen -t ecdsa -f /etc/ssh/ssh_host_ecdsa_key
ssh-keygen -t ed25519 -f /etc/ssh/ssh_host_ed25519_key
3.3、添加用户
公网这台 Teleport 将会作为主要的接入机器,所以在此节点内添加的用户将有权限登录所有集群,包括内网的另一个集群;所以为了方便以后操作先添加一个用户
# 添加一个用户名为 mritd 的用户,该用户在所有集群具有 root 用户权限
tctl --config /etc/teleport/teleport.yaml users add mritd root
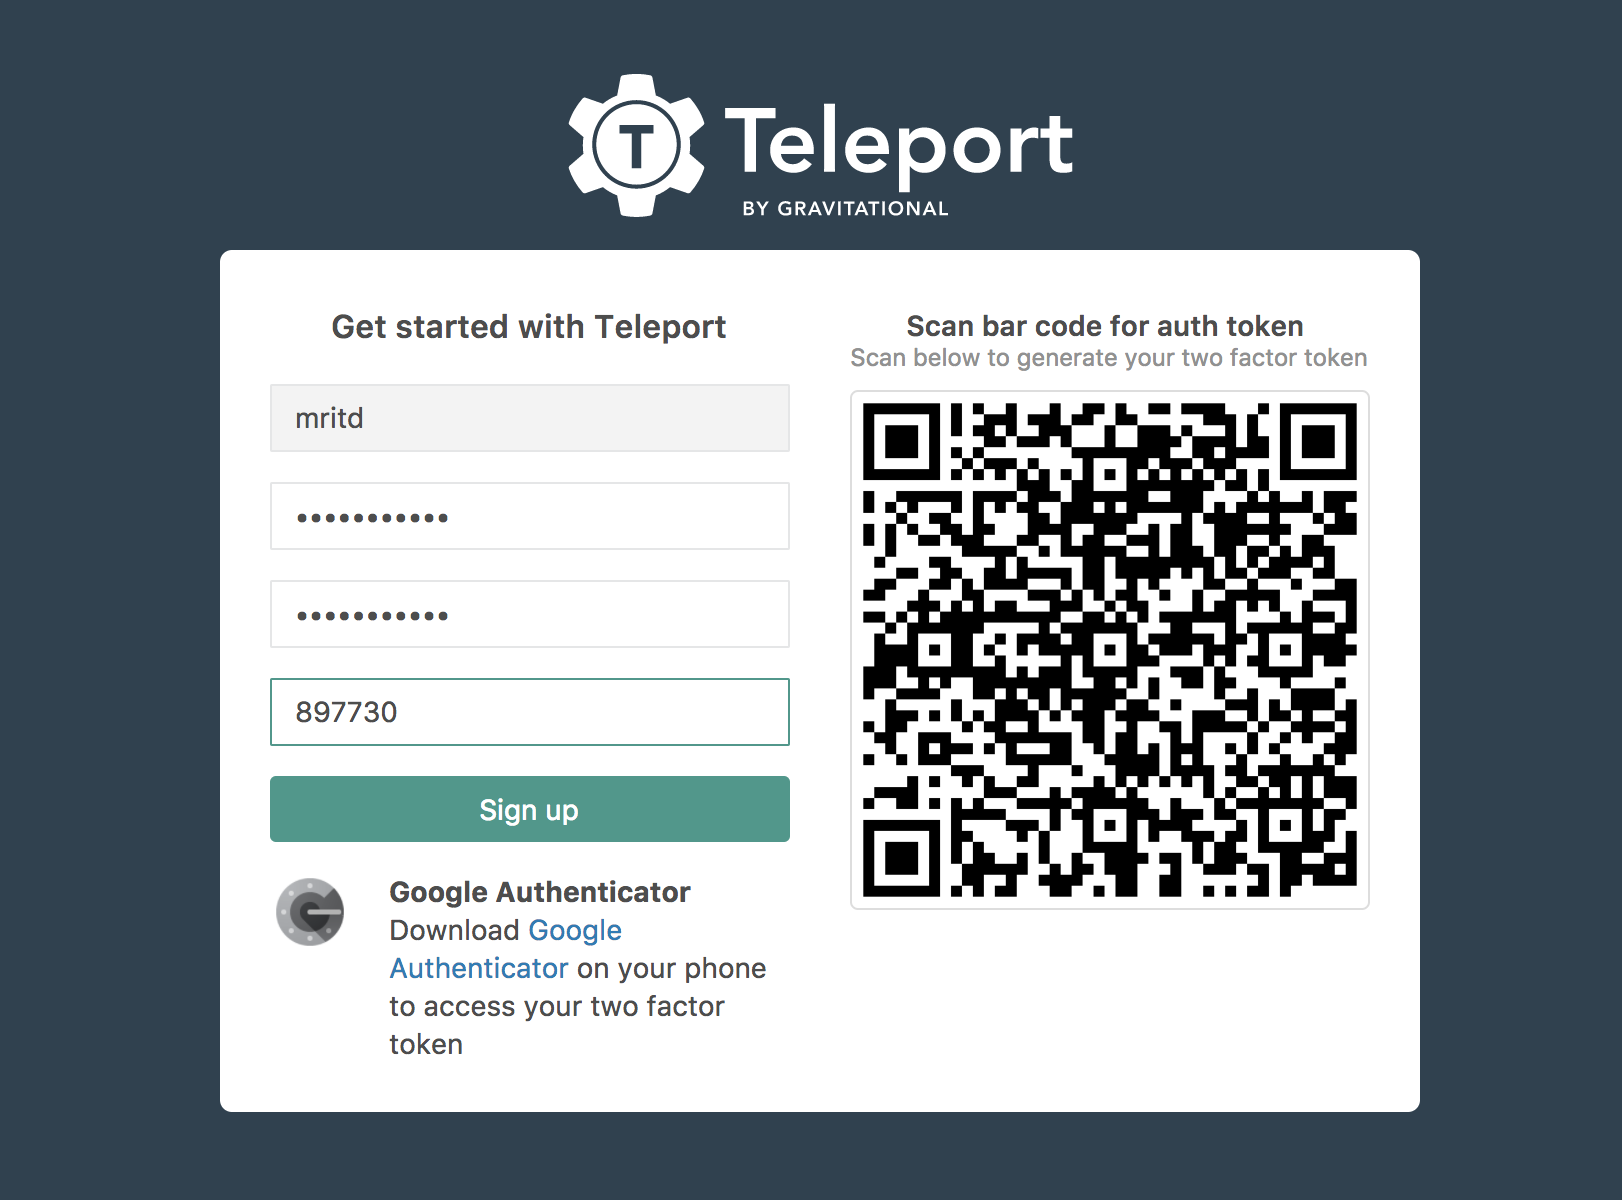
添加成功后会返回一个 OTP 认证初始化地址,浏览器访问后可以使用 Google 扫描 OTP 二维码从而在登录时增加一层 OTP 认证

访问该地址后初始化密码及 OTP
四、搭建内网 Master
内网搭建 Master 和公网类似,只不过为了安全将所有 0.0.0.0 的地址全部换成内网 IP 即可,以下为内网的配置信息
# By default, this file should be stored in /etc/teleport.yaml

# This section of the configuration file applies to all teleport
# services.
teleport:
    # nodename allows to assign an alternative name this node can be reached by.
    # by default it's equal to hostname
    nodename: mritd.test1

    # Data directory where Teleport keeps its data, like keys/users for
    # authentication (if using the default BoltDB back-end)
    data_dir: /data/teleport

    # one-time invitation token used to join a cluster. it is not used on
    # subsequent starts
    auth_token: jYektagNTmhjv9Dh

    # when running in multi-homed or NATed environments Teleport nodes need
    # to know which IP it will be reachable at by other nodes
    advertise_ip: 172.16.0.80

    # list of auth servers in a cluster. you will have more than one auth server
    # if you configure teleport auth to run in HA configuration
    auth_servers:
        - 172.16.0.80:3025

    # Teleport throttles all connections to avoid abuse. These settings allow
    # you to adjust the default limits
    connection_limits:
        max_connections: 1000
        max_users: 250

    # Logging configuration. Possible output values are 'stdout', 'stderr' and
    # 'syslog'. Possible severity values are INFO, WARN and ERROR (default).
    log:
        output: stdout
        severity: INFO

    # Type of storage used for keys. You need to configure this to use etcd
    # backend if you want to run Teleport in HA configuration.
    storage:
        type: bolt

    # Cipher algorithms that the server supports. This section only needs to be
    # set if you want to override the defaults.
    ciphers:
      - aes128-ctr
      - aes192-ctr
      - aes256-ctr
      - aes128-gcm@openssh.com
      - arcfour256
      - arcfour128

    # Key exchange algorithms that the server supports. This section only needs
    # to be set if you want to override the defaults.
    kex_algos:
      - curve25519-sha256@libssh.org
      - ecdh-sha2-nistp256
      - ecdh-sha2-nistp384
      - ecdh-sha2-nistp521
      - diffie-hellman-group14-sha1
      - diffie-hellman-group1-sha1

    # Message authentication code (MAC) algorithms that the server supports.
    # This section only needs to be set if you want to override the defaults.
    mac_algos:
      - hmac-sha2-256-etm@openssh.com
      - hmac-sha2-256
      - hmac-sha1
      - hmac-sha1-96

# This section configures the 'auth service':
auth_service:
    # Turns 'auth' role on. Default is 'yes'
    enabled: yes

    authentication:
        # default authentication type. possible values are 'local', 'oidc' and 'saml'
        # only local authentication (Teleport's own user DB) is supported in the open
        # source version
        type: local
        # second_factor can be off, otp, or u2f
        second_factor: otp
        # this section is used if second_factor is set to 'u2f'
        #u2f:
        #    # app_id must point to the URL of the Teleport Web UI (proxy) accessible
        #    # by the end users
        #    app_id: https://localhost:3080
        #    # facets must list all proxy servers if there are more than one deployed
        #    facets:
        #    - https://localhost:3080

    # IP and the port to bind to. Other Teleport nodes will be connecting to
    # this port (AKA "Auth API" or "Cluster API") to validate client
    # certificates
    listen_addr: 172.16.0.80:3025

    # Pre-defined tokens for adding new nodes to a cluster. Each token specifies
    # the role a new node will be allowed to assume. The more secure way to
    # add nodes is to use `ttl node add --ttl` command to generate auto-expiring
    # tokens.
    #
    # We recommend to use tools like `pwgen` to generate sufficiently random
    # tokens of 32+ byte length.
    tokens:
        - "proxy,node:jYektagNTmhjv9Dh"
        - "auth:jYektagNTmhjv9Dh"

    # Optional "cluster name" is needed when configuring trust between multiple
    # auth servers. A cluster name is used as part of a signature in certificates
    # generated by this CA.
    #
    # By default an automatically generated GUID is used.
    #
    # IMPORTANT: if you change cluster_name, it will invalidate all generated
    # certificates and keys (may need to wipe out /var/lib/teleport directory)
    cluster_name: "nat"

# This section configures the 'node service':
ssh_service:
    # Turns 'ssh' role on. Default is 'yes'
    enabled: yes

    # IP and the port for SSH service to bind to.
    listen_addr: 172.16.0.80:3022
    # See explanation of labels in "Labeling Nodes" section below
    labels:
        role: master

    # List of the commands to periodically execute. Their output will be used as node labels.
    # See "Labeling Nodes" section below for more information.
    commands:
    - name: arch             # this command will add a label like 'arch=x86_64' to a node
      command: [uname, -p]
      period: 1h0m0s

    # enables reading ~/.tsh/environment before creating a session. by default
    # set to false, can be set true here or as a command line flag.
    permit_user_env: false

# This section configures the 'proxy servie'
proxy_service:
    # Turns 'proxy' role on. Default is 'yes'
    enabled: yes

    # SSH forwarding/proxy address. Command line (CLI) clients always begin their
    # SSH sessions by connecting to this port
    listen_addr: 172.16.0.80:3023

    # Reverse tunnel listening address. An auth server (CA) can establish an
    # outbound (from behind the firewall) connection to this address.
    # This will allow users of the outside CA to connect to behind-the-firewall
    # nodes.
    tunnel_listen_addr: 172.16.0.80:3024

    # The HTTPS listen address to serve the Web UI and also to authenticate the
    # command line (CLI) users via password+HOTP
    web_listen_addr: 172.16.0.80:3080

    # TLS certificate for the HTTPS connection. Configuring these properly is
    # critical for Teleport security.
    #https_key_file: /var/lib/teleport/webproxy_key.pem
    #https_cert_file: /var/lib/teleport/webproxy_cert.pem
配置完成后直接启动即可
systemctl enable teleport
systemctl start teleport
五、将内网集群链接至公网
上文已经讲过,Teleport 通过公网链接内网主机的方式是让内网集群向公网打通一条 ssh 隧道,然后再进行通讯;具体配置如下
5.1、公网 Master 开启授信集群
在公网 Master 增加 Token 配置,以允许持有该 Token 的其他内网集群连接到此,修改 /etc/teleport/teleport.yaml 增加一个 token 即可
tokens:
    - "proxy,node:jYektagNTmhjv9Dh"
    - "auth:jYektagNTmhjv9Dh"
    - "trusted_cluster:xiomwWcrKinFw4Vs"
然后重启 Teleport
systemctl restart teleport
5.2、内网 Master 链接公网 Master
当公网集群开启了允许其他集群链接后,内网集群只需要创建配置进行连接即可,创建配置(cluster.yaml)如下
# cluster.yaml
kind: trusted_cluster
version: v2
metadata:
  # the trusted cluster name MUST match the 'cluster_name' setting of the
  # cluster
  name: local_cluster
spec:
  # this field allows to create tunnels that are disabled, but can be enabled later.
  enabled: true
  # the token expected by the "main" cluster:
  token: xiomwWcrKinFw4Vs
  # the address in 'host:port' form of the reverse tunnel listening port on the
  # "master" proxy server:
  tunnel_addr: 92.223.67.84:3024
  # the address in 'host:port' form of the web listening port on the
  # "master" proxy server:
  web_proxy_addr: 92.223.67.84:3080
执行以下命令使内网集群通过 ssh 隧道连接到公网集群
tctl --config /etc/teleport/teleport.yaml create /etc/teleport/cluster.yaml
注意,如果在启动公网和内网集群时没有指定受信的证书( https_cert_file、https_key_file ),那么默认 Teleport 将会生成一个自签名证书,此时在 create 受信集群时将会产生如下错误:
the trusted cluster uses misconfigured HTTP/TLS certificate
此时需要在 待添加集群(内网) 启动时增加 --insecure 参数,即 Systemd 配置修改如下
[Unit]
Description=Teleport SSH Service
After=network.target

[Service]
Type=simple
Restart=always
ExecStart=/usr/local/bin/teleport start --insecure -c /etc/teleport/teleport.yaml

[Install]
WantedBy=multi-user.target
然后再进行 create 就不会报错
六、添加其他节点
两台节点打通后,此时如果有其他机器则可以将其加入到对应集群中,以下以另一台内网机器为例
由于在主节点 auth_service 中已经预先指定了一个 static Token 用于其他节点加入( proxy,node:jYektagNTmhjv9Dh ),所以其他节点只需要使用这个 Token 加入即可,在另一台内网主机上修改 Systemd 配置如下,然后启动即可
[Unit]
Description=Teleport SSH Service
After=network.target

[Service]
Type=simple
Restart=always
ExecStart=/usr/local/bin/teleport start --roles=node,proxy \
                                        --token=jYektagNTmhjv9Dh \
                                        --auth-server=172.16.0.80

[Install]
WantedBy=multi-user.target
此时在内网的 Master 上可以查看到 Node 已经加入
test1.node ➜ tctl --config /etc/teleport/teleport.yaml nodes ls
Hostname    UUID                                 Address          Labels
----------- ------------------------------------ ---------------- -----------------------
test2.node  abc786fe-9a60-4480-80f7-8edc20710e58 172.16.0.81:3022
mritd.test1 be9080fb-bdba-4823-9fb6-294e0b0dcce3 172.16.0.80:3022 arch=x86_64,role=master
七、连接测试
7.1、Web 测试
Teleport 支持 Web 页面访问,直接访问 https://公网IP:3080,然后登陆即可,登陆后如下
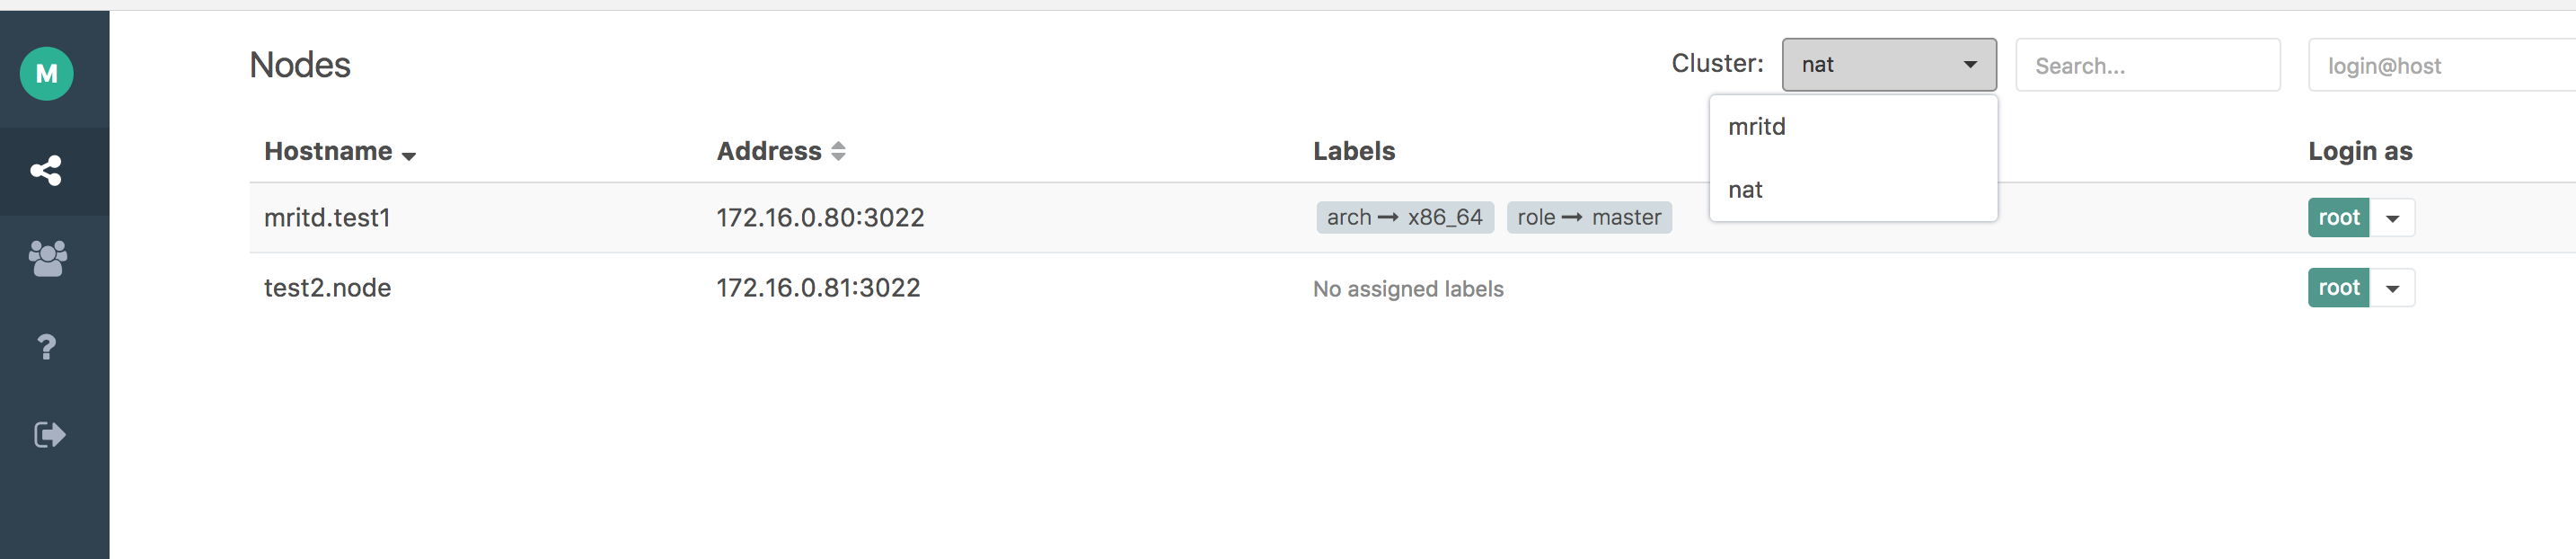
通过 Cluster 选项可以切换不同集群,点击后面的用户名可以选择不同用户登录到不同主机(用户授权在添加用户时控制),登陆成功后如下

通过 Teleport 进行的所有操作可以通过审计菜单进行操作回放

7.2、命令行测试
类 Uninx 系统下我们还是习惯使用终端登录,终端登录需要借助 Teleport 的命令行工具 tsh,tsh 在下载的 release 压缩版中已经有了,具体使用文档请自行 help 和参考官方文档,以下为简单的使用示例
- 登录跳板机: 短时间内只需要登录一次即可,登录时需要输入密码及 OTP 口令
export TELEPORT_PROXY=92.223.67.84
export TELEPORT_USER=mritd
tsh login --insecure
- 登录主机: 完成上一步 login 后就可以免密码登录任意主机
# cluster 名字是上面设置的,在 web 界面也能看到
tsh ssh --cluster nat root@test2.node
- 复制文件: 复制文件时不显示进度,并非卡死
tsh scp --cluster nat teleport-v2.3.5-linux-amd64-bin.tar.gz root@test2.node:/

-> teleport-v2.3.5-linux-amd64-bin.tar.gz (16797035)
转载请注明出处,本文采用 CC4.0 协议授权